People have been harvesting hops to make delicious homemade beer for thousands of years.
Honestly, nothing much has changed (besides the Space-Age stainless steel technology used to mash, sparge, and boil genetically engineered plants perfectly).
In this complete guide on how to grow hops at home, we cover everything from the perfect location to how to dry and freeze them for later use.
Now, you’ll be able to serve up homebrew that is actually 100% made from scratch.
What is a Hop?
 Hops are in beer—that makes them pretty important to begin with.
These cone-shaped flowers are the main ingredient used to flavor beer, mostly because of their flexibility, sense of bitterness, and preservative effect on the beverage.
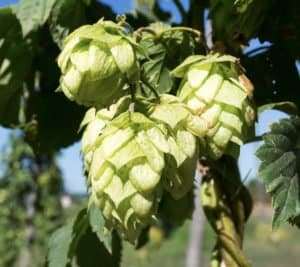
What do hops look like?
A picture is worth a thousand words right? Best to take a look at the image on the left.
There are as many types of hops as there are brands of beer (slight exaggeration), and each produces its own distinctive personality. That’s the main reason why modern beer brewers love them so much.
So now that you can’t wait to start picking your own batch off of your fence (and everywhere else in your yard), let’s get into how to grow them.
We’ll cover the process in 3 main phases:
- Growing
- Harvesting
- Drying
And a bit of freezing thrown in for good measure.
“Hops contain an essential oil with a very bitter flavor. This bitterness counters the sweetness from the malt to create a more balanced beer, and it also acts as a preservative.”
– Emma Christensen, Brewer
1. How to Grow Hops?
All you need to get started are some rhizomes (roots cut from a hop plant), some sunshine, and space to grow. Chances are you’ve got the latter two already (we hope), so let’s start with rhizomes.
Let’s start with how to get hops.
1.1 When to Buy
Rhizomes are available in March/April at most home growers/outdoors shops. Some of the most popular varieties may have to be pre-ordered, but usually just putting your name on the mailing list will do fine.
As soon as they arrive, you’ll be notified.
1.2 Basic Requirements
 Did you know that hops became popular for brewing alcohol in climates where growing grapes wasn’t feasible? Makes sense.
The good news is that hops can grow in pretty much any mild/temperate climate during the summer.
As long as you have a minimum of 4 months frost-free (pretty much everywhere in the USA). Here’s what you’ll need:
- Space: Your hops are going to turn into growing machines (sometimes up to 1 ft. per day), so make you’ve got plenty of room. The ideal site will have direct access to sunlight, plenty of fencing, and open vertical space above (i.e., no power lines).
- Support: You don’t have to sing to your plants, but you should support them as much as possible. Tall poles and twine are best, or, if you really want to be rustic and patriotic, a flagpole is a great idea. We’ve even seen people use clotheslines before.
- Soil: With the advent of fertilizers, most soil is fine for growing plants. Still, you want a Ph between 6.0-8.0 if possible. Manure compost and commercial fertilizers are a must.
1.3 Planting
 Now that you’ve chosen your location, let’s move on to preparing the soil and rhizomes and actually sticking them in the ground.
- Maintain your rhizomes: If you buy them a bit early (before the ground has thawed), keep them refrigerated and mist them lightly on a regular basis.
- Prepare the soil: Mix some topsoil and compost if necessary into your soil with a gardening fork or other tool. Make sure you’ve turned it over well.
- Plant your rhizomes: Stick those bad boys in the ground with the buds facing up, and cover them with about 2 inches of soil.
It’s really that simple. Of course, like all plants, your hops are going to need some TLC. You’ll want to maintain the rhizomes with frequent short waterings.
In the first season, the plant focuses on planting deep roots to survive droughts, so don’t expect too much in year one. Short waterings are enough in the first season.
Next season, you’ll have to focus on longer watering methods like drip irrigation. But anyway, we digress.
1.4 Maintenance
 If you don’t maintain your hops, your yard will begin to look like that overgrown abandoned house down the street and not in a good way.
Worse, it may lead to pests and plant diseases that will ruin your plant.
So get your green thumb out and get ready to trim branches, plant poles, and mulch your soil to no end.
Useful vocabulary:
- Bine: This isn’t a typo. A bine is similar but different from a vine. It is the climbing stem of your hop plant.
- Trellis: A framework of wood or metal for supporting your plants.
Here are a few tips:
- Mulch: Use organic material to mulch the soil frequently. This will control weeds, and is very important to keep your beer organic.
- Plant a trellis (or some basic support): We recommend strong poles in the ground to keep it simple. Strong wire also works well. Hop plants can grow up to 30 feet if the support system allows it! If you want to be ambitious, build a full trellis support system or purchase one from a store.
- Select the strongest branches: Wait until the bine is about 1-foot long and select 2 or 3 of the strongest branches. Why? Survival of the fittest. By trimming the weaker branches, you allow the plant to focus on its strongest branches. Also, you avoid entanglement issues. Now that you’ve chosen the branches, wrap them around your chosen support system.
- Trim, trim, and trim: Keep a close eye on your plant and be sure to trim regularly. We mean like 2-3 chutes off of the bine each time. The last thing you need when harvesting your hops is battling a jungle of tangled up arms of a hop plant.
1.5 Pests to Watch Out for
Your neighbors won’t be the only ones interested in what’s going on in your backyard. There are plenty of pests who will set their sights on your garden.
Pro Tip: Inspect frequently and have a big hose on standby.
Most are easy to spot, and, with the right insecticides (or plain water), get rid of. Keep an eye out for these two:
- The Hop Aphid: These pale-green pests haunt hopyards and can destroy an entire harvest. A strong blast of water is usually enough to get them off your bines. You can also use commercial insecticides. [2]
- The Spotted Cucumber Beetle: They look a lot like ladybugs but vary in color and size. Commercial insecticides will do the trick too.
Depending on the height of your plant, you may need to jump up on a ladder.
Aside from pests, you need to keep a close eye out for mildew. If you spot discolored or soggy leaves, remove them immediately. If it is severe, you may need to invest in a fungicide.
Once August rolls around, most plants are ready to be harvested.
2. Harvesting
2.1. When to Harvest Hops?
 Late summer nights slowly blend into crisp fall early evenings, and your skyscraping vines are now reaching ever closer toward the dull grey skies.
OK, enough of the theatrics. It’s time for the harvest!
After a few months, your plants should be ready to bear their fruit. Here’s how to tell if your hops are ready to be picked:
- Feel the cones. Are they dry and papery? If so, they are ready to go.
- Lupulin is the main ingredient in hops. When ripe, its yellow powder and aroma should be obvious. Roll the hops in your hand… do they get sticky? Smell the cones? Do they smell aromatic?
- Lastly, try to crush one of the cones. If it springs back to full form, they are ripe.
If all of these tests fail, give them a little bit more time.
Remember: Cones tend to ripen at different rates depending on exposure to sunlight, so the higher cones might ripen faster. Also, different varieties ripen at various speeds.
As you become more experienced, you’ll get a better feel for things. Be prepared for several harvesting sessions to get the best hops possible.
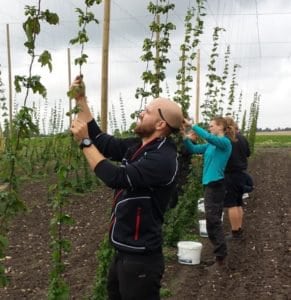
2.2. How to Harvest Hops?
 Now the fun, albeit tedious part happens. For larger plants, you’ll need:
- Long sleeves (the plants can be abrasive)
- Sturdy Gloves
- A ladder (if your plants reach up really high)
- A six pack (hey, your friends aren’t going to come help you for free)
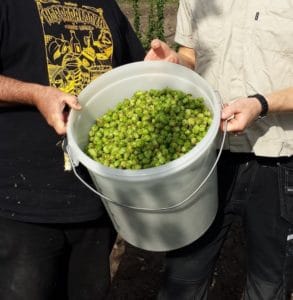
- A large bucket
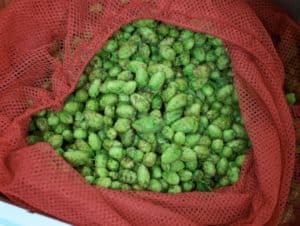
Picking them is really simple. Just pull (or cut) the bine down and pick them one by one with your hands. Throw them into the bucket and you’re all set.
If you cut down the bines, let them lay on the ground to strengthen their roots. This is only necessary in the first year.
3. How to Dry Hops?
Without getting into the specifics of the science, drying hops is necessary because it gives you more control over the flavors.
According to a study, different temperatures can affect the bitterness of the end result after dry-hopping. [3]
Moist hops are unpredictable whereas dry ones can be manipulated to create all of the extremely delicious beers we enjoy today.
When drying, you have two choices:
- Quickly with high heat: This takes less time but yields lower quality hops.
- Slowly with moderate temperature: Takes longer and requires more care but produces higher quality.
3.1. Methods of Drying Hops
The three main ways are:
 Low-tech (preferred): Use a screen and a fan to dry your hops if your batch is small. Wash and dry the screen and lay it on top of a fan on low power.
Make sure the fan is off the ground. One trick is to put several bricks in a square formation and place the fan on top. Then lay the screen on top of the fan and pour your hops on.
Medium-tech: Put them in an oven on a pan. Make sure the oven is on very low heat and keep an eye on them.
In either case, you don’t want the hops to turn brown or dry so much that they break in your hand.
Food Dehydrator: These are a godsend for impatient harvesters. Basically, it’s a kitchen appliance that dries food for storage. It uses a combo of heat and airflow to remove water from food, making it easier to store.
Load the hops in, press the button, and let it sit for several hours. Just don’t let the heat get too high and keep an eye on your harvest.
The reason you don’t want to overdry them is that they will lose alpha acids, which are basically the ingredient that you’ve just done this whole process for.
They are what gives the beer the flavors that we crave. You don’t want to waste your entire harvest season by leaving them out to dry too long!
4. How to Store Hops?
 Learning how to store hops is essential.
Thankfully, storing hops is easier than finishing a pint of delicious home brew.
The best way: Place your hops in an airtight, vacuum-sealed bag and toss them in the freezer. This will preserve their alpha acids the best way possible.
Alternatively, you an use glass jars and store them in the freezer.
If you plan to use them instantly, you can also store them in a mason jar in the fridge. Just use them quickly.
Check out the following video for a summary of the entire process:
What Are You Waiting For? Hop To It
There’s no feeling as rewarding as growing your own hops to use in some delicious homebrew. At least not when it comes to beer.
Planting, maintaining, and harvesting hops isn’t all that hard once you get the hang of it. Now that you know how to grow hops at home, you can truly say your beer is made from scratch.
Now that you’ve grown your hops, you must be ready to make your own homebrew. Make sure to check out our page on the best home brewing kits.
These kits are designed to get you started on your brewing adventures.